
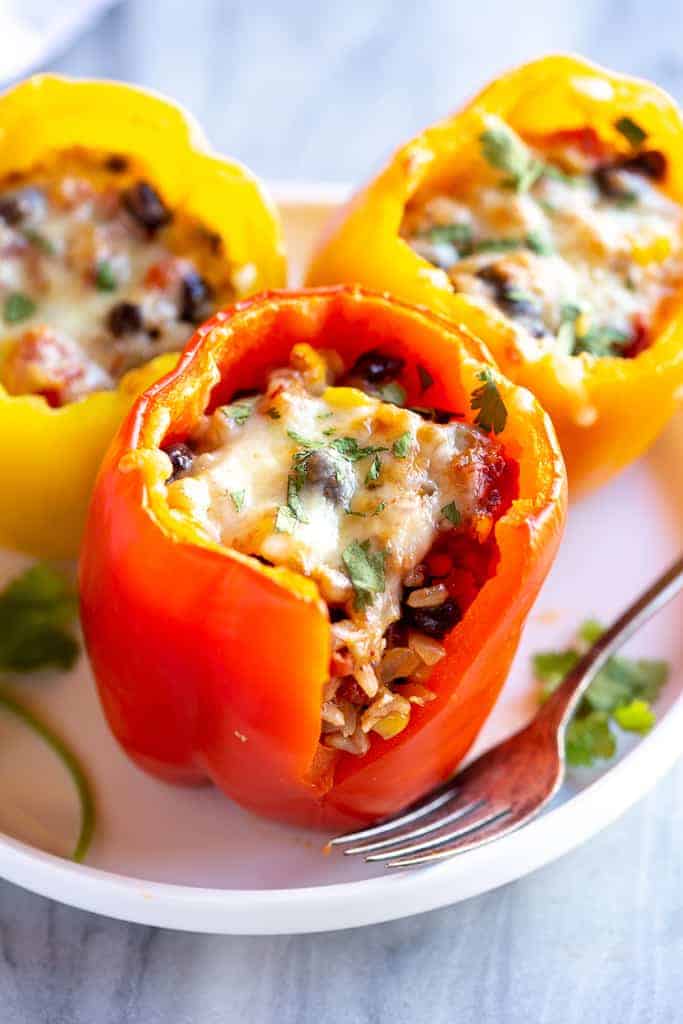
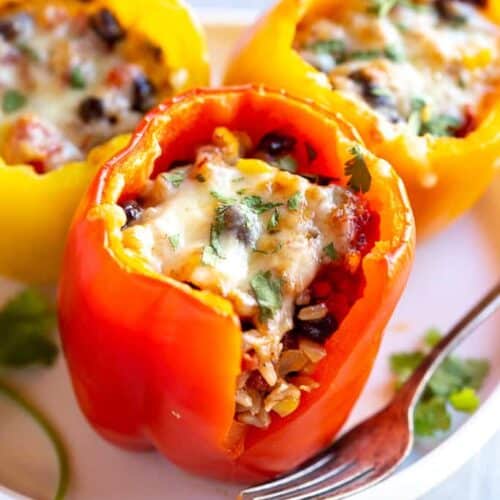
These delicious Vegetarian Stuffed Peppers are loaded with rice, veggies, black beans, spices and smothered with cheese. They’re so flavorful and and it’s just a bonus that they’re healthy too!
Most nights a lighter dinner that’s loaded with veggies is just the thing I need, and I promise you this healthy stuffed peppers recipe will not disappoint! And, don’t miss my other vegetarian recipes including my favorite Quinoa Salad, and Lentil Tacos!
Why I love this recipe:
- Healthy, filling, and delicious: Traditional stuffed pepper recipes are often loaded with ground beef and cheese, but these healthy stuffed peppers are just as flavorful, made with have hearty ingredients that will leave you filling full, with a lot less calories.
- Adaptable: This is a great recipe to use what you have! Use whatever type of rice/grain you like, and throw in veggies you have in your fridge, rather than going to the store for exactly what I’ve called for.
- Fast: You will notice I bake the bell peppers alone first, and then make the filling while they bake. This saves time so they don’t take as long to cook after they are stuffed.
My whole family loves them this recipe so much. I cut the peppers up for my kids and give them some tortilla chips or a whole wheat flour tortilla to eat with it, and everyones happy.
How to Make Stuffed Peppers:
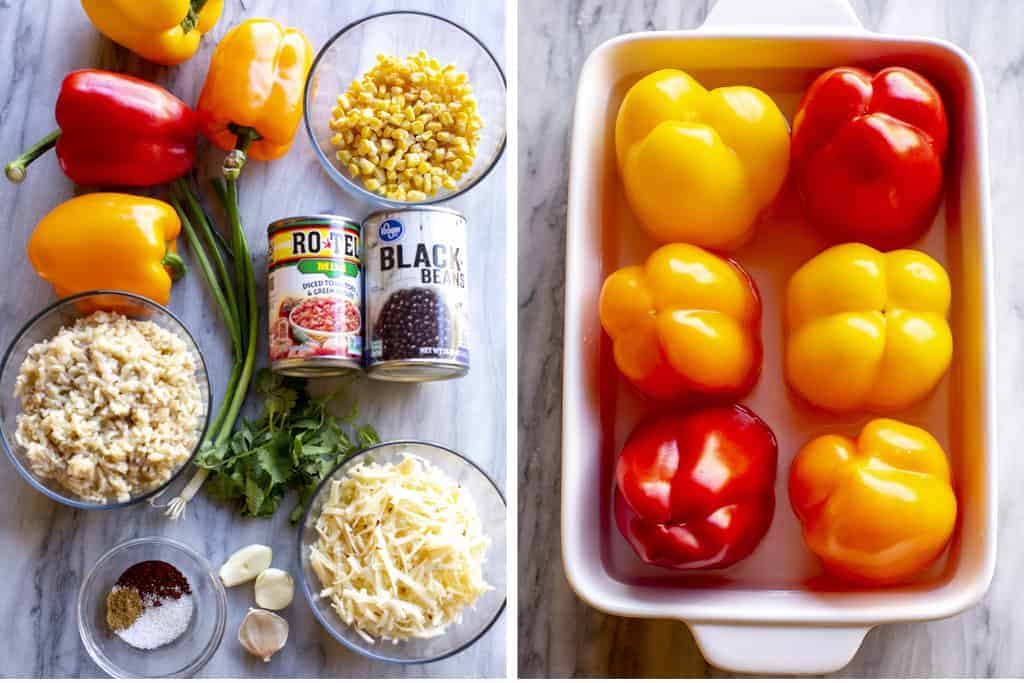
1. Prep bell peppers. Cut ¼-inch from tops of bell peppers and remove the stem, ribs and seeds.
2. Bake peppers. Fill a large baking dish with 1/2-inch of water. Place peppers cut-side down in the water and bake for 20 minutes.
3. Make filling. Cook onion and garlic in oil. Add corn, beans, diced tomatoes, green onions, chili powder, cumin, salt, and pepper. Stir until corn and beans are heated through, about 5 minutes. Remove skillet from heat and stir in rice, 1 cup cheese, and cilantro. Stir to combine. Taste and add additional seasonings, if needed.

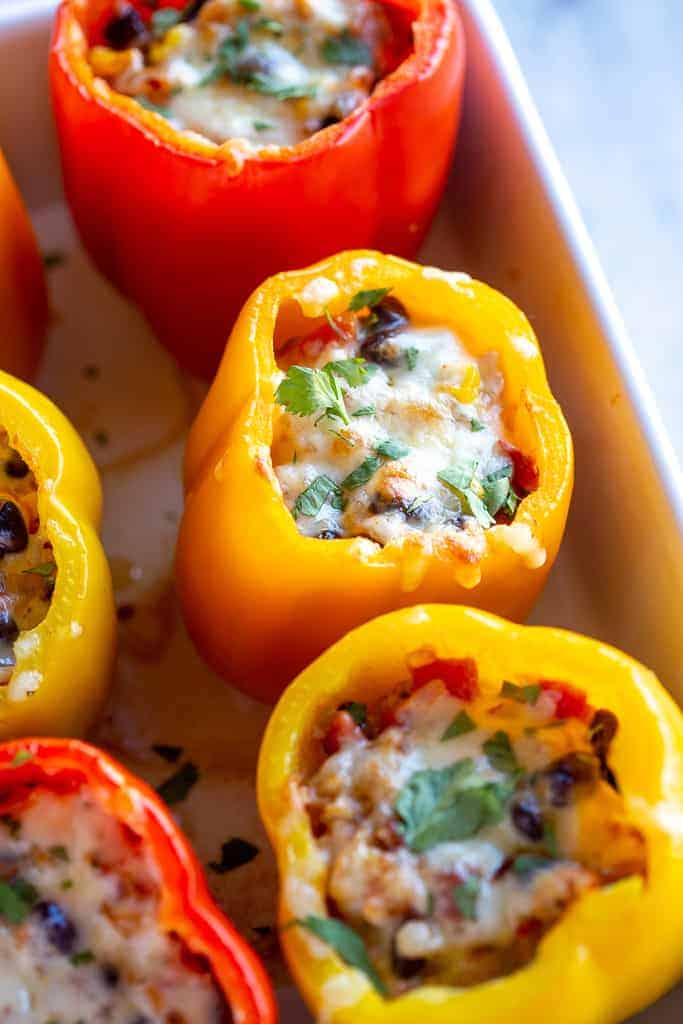
4. Fill peppers. Remove peppers from oven and drain water from dish. Divide the mixture evenly between the peppers, then top with remaining cheese.
5. Bake. Return to oven for 10-15 more minutes, until peppers are tender and cheese is melted.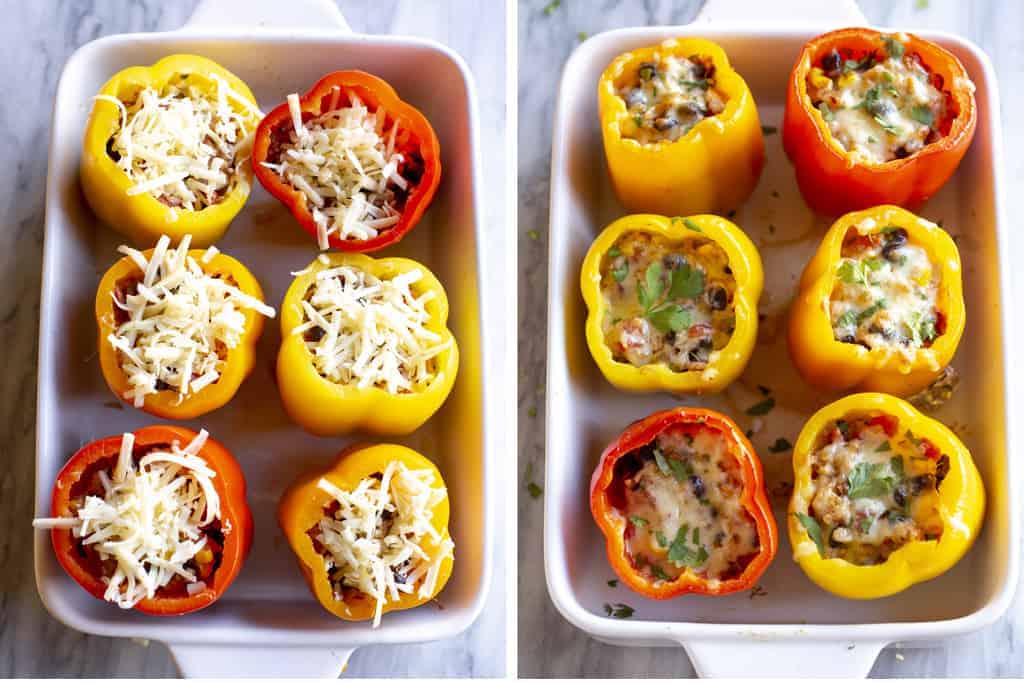
Which peppers to use:
You can use any type of bell peppers (or even a pasilla pepper) for this recipe, but I prefer the sweeter bell peppers (red, orange and yellow). They all taste slightly different but all of them have a similar mild heat. (Did you know green bell peppers are actually unripe red bell peppers?)
TIP: Be sure to choose big, round bell peppers so there is plenty of room for stuffing them, and I like to pick ones with four bumps on the bottom so they sit flat in the baking dish.
Looking for something to serve with Stuffed Bell Peppers? Try one of these:
- Warm Corn or flour tortillas
- Green salad
- Tortilla chips
MAKE AHEAD AND FREEZING INSTRUCTIONS:
To make-ahead: These stuffed peppers can be make 1-2 days ahead of time. Make the recipe through step 6, fill the peppers with filling, top them with cheese and store, covered, in the refrigerator.
To freeze: Make the stuffed peppers through step 6, fill the peppers with filling and top them with cheese. Once they’ve cooled completely, place them in a freezer safe container and freeze for 2-3 months. Allow them to thaw in the refrigerator overnight and bake as directed in step 7.
You can also FOLLOW ME on FACEBOOK, TWITTER, INSTAGRAM and PINTEREST for more great recipes!
Recipe
Southwest Vegetarian Stuffed Peppers
Ingredients
- 6 sweet bell peppers (red, yellow, or orange)
- 1 1/2 cups cooked rice (white, brown, cauliflower rice or quinoa)
- 1 Tbsp olive oil
- 1 small onion , diced
- 3 garlic cloves , minced
- 1 14.5 ounce can diced tomatoes with green chiles , mild
- 1 14 oz can black beans , drained and rinsed
- 1 cup frozen corn
- 2 green onions , chopped
- 1 tsp chili powder
- ½ teaspoon ground cumin
- 1 tsp kosher salt , plus more to taste
- 1/4 black pepper , plus more to taste
- 1 1/2 cups shredded cheese , Mexican blend or pepperjack cheese, divided
- ¼ cup chopped fresh cilantro
Instructions
- Preheat oven to 400 degrees F.
- Cut ¼-inch from tops of bell peppers and remove the stem, ribs and seeds.
- Fill a large baking dish with 1/2-inch of water.
- Place peppers cut-side down in the water and bake for 20 minutes.
- Heat oil in a 12-inch skillet over medium-high heat. Add onion and cook until softened, about 5 minutes. Add garlic and cook for 30 seconds. Add corn, beans, diced tomatoes, green onions, chili powder, cumin, salt, and pepper. Stir until corn and beans are heated through, about 5 minutes.
- Remove skillet from heat and stir in rice, 1 cup cheese, and cilantro. Stir to combine. Taste and add additional seasonings, if needed.
- Remove peppers from oven and drain water from dish. Divide the mixture evenly between the peppers, then top with remaining cheese. Return to oven for 10-15 more minutes, until peppers are tender and cheese is melted.
- Store leftover peppers in the refrigerator, covered for 4-5 days.
Notes
Nutrition
Did You Make This Recipe?
Tag @TastesBetterFromScratch on Instagram with #TastesBetterFromScratch!
Recipe adapted from America’s Test Kitchen
HAVE YOU TRIED THIS RECIPE?!
RATE and COMMENT below! I would love to hear your experience.
This post contains affiliate links.

These are delicious. I’m always looking for healthy and meatless meals and these stuffed peppers are a favorite with my family. So tasty.
This was delicious! Thank you! <3
These were great and easy, had a lot more stuffing than I needed so will have it with something else as I picked peppers from my garden that were not particularly huge. I used some roasted hatch peppers I had added to the diced tomatoes and they were great. Thanks
My husband loved this recipe. He demanded that I make it again. I’ve done stuffed peppers in the past, but it was a crock pot recipe. I’m sure if that’s the difference, but this recipe really was much yummier. He’s on a low carb diet right now, so I used cauliflower rice. Just the Green Giant steamer bag. It tasted great!
Amazing one of my fave teas! Is the 313 calories per pepper or for all 6?
Per serving!
This recipe is consistently tasty and feeds the whole family!
This is delicious!!! I followed the recipe very closely and it worked perfectly. It was great as a summer dinner for my vegetarian family and with a bit more cheese, it was amazing as a filling winter meal. I serve it with barbecued chicken on the side when we have non vegetarian guests. So so good.